Rivets
Aludecor presents
Best Quality RIVETS for ACPs
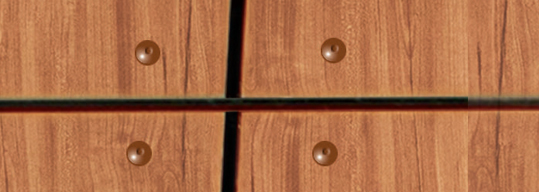
Aludecor presents superior-quality rivets for ACPs. Available in four different shades, they are light weight, rust-proof and can be easily concealed with the ACP sheets.
Available in 4 Colours

| Size of each rivet | 4x21x15mm |
| Quantity | 40 rivets in a box |
| Suggested areas of application: | ACP cladding, ACP facade, ACP wall panels etc. |
| Rivet type: | Coloured Bling Rivet |
| Mandrel | Galvanised Carbon Steel |
| Rivet Body | Aluminium |
| Primary advantages | a. Easy to install b. Possess high resistance to atmospheric and chemical corrosion |
INSTALLATION TECHNIQUES OF ACE
METHOD OF RIVETING
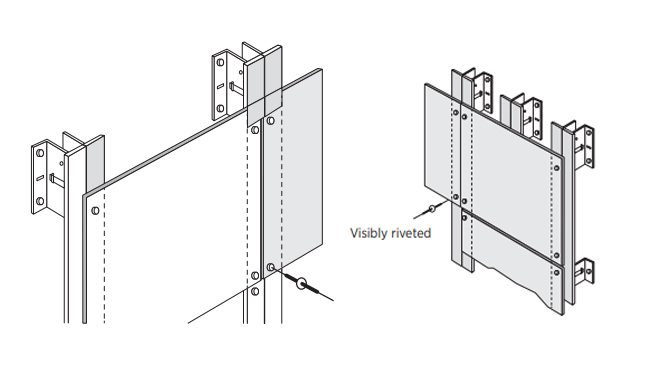
The riveted assembly system is a versatile system as it adapts perfectly to any architectonic typology. It is a seen fixing system that can be assembled rapidly. It admits as many horizontal pieces as vertical. versatile system as it adapts perfectly to any architectonic typology. It is a seen fixing system that can be assembled rapidly. It admits as many horizontal pieces as vertical.
Furthermore, by using panels that have not been shaped, it offers the possibility of executing curved areas. For all of this, the riveted system complies with the requisites in order to execute the most demanding architectonic claddings.
All of the substructure is made with 6063.
AUXILIARY ELEMENTS FOR THE RIVETED SYSTEM

ASSEMBLY DIAGRAM SYSTEM RIVETED
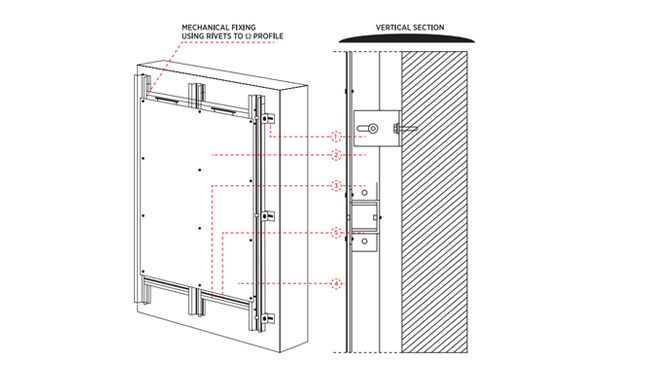
| Serial | Designation |
|---|---|
| 1 | Double T profile bracket |
| 2 | Omega mullion profile |
| 3 | Joining profile between omegas |
| 4 | Aludecor composite panel |
| 5 | Omega transom profile |
| 6 | Blind rivet |
TYPES OF RIVET SYSTEM

INSTALLATION TECHNIQUES OF ACE
Precautions
Clean the surface with damp paper, moving in only one direction as if sanding. Dissolvent should never be used.
For prior cleaning and de-greasing, use de-greaser and cleaner or similar and allow for it to evaporate for at least 10 minutes.
Area priming
The priming is made with a product that reinforces the adherence of the adhesive paste to the substructure using panel primer or similar.
Precautions
Once hardened, the priming can only be removed mechanically.
The priming leaves a heterogeneous film. The surfaces should only be treated if they are going to be glued.
It is essential to respect the cleaner evaporation times in all circumstances (30, 60 mins.)
Application of the double-sided adhesive tape
The double-sided tape or similar is to be used for the initial fixing of the panels until the adhesive has polymerized and reached a minimum thickness of 3 mm so that it can absorb the possible expansions and vibrations in the facade. The long-term resistance is achieved only with the adhesive.
Panel fitting
Remove the film protector from the double sided adhesive tape. Carefully fit the panel in its exact position and press firmly until the panel makes contact with the double sided tape. Always comply with the instructions regarding their storage. Avoid exposure to heat and direct sunlight prior to gluing the panels.
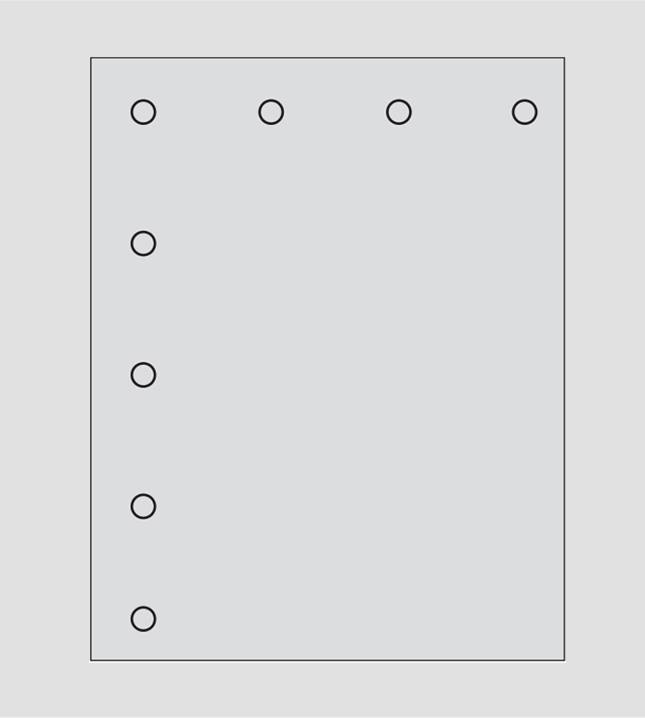
In the drawing the perforation diameters are demonstrated and the maximum distance to where these have to be situated.
The panels are installed at the site after being perforated. They are fitted with the corresponding rivets. This must be done with attention to the play between the screw’s diameter and the rivet pin as well as the distance between rivet and the panel edges.
We recommend using a guide in order to position the rivets. Special attention must be paid to the direction indicated by an arrow on the film-protector in order to guarantee that different tones are not produced when the sun shines on the facade.
METHOD OF PASTING
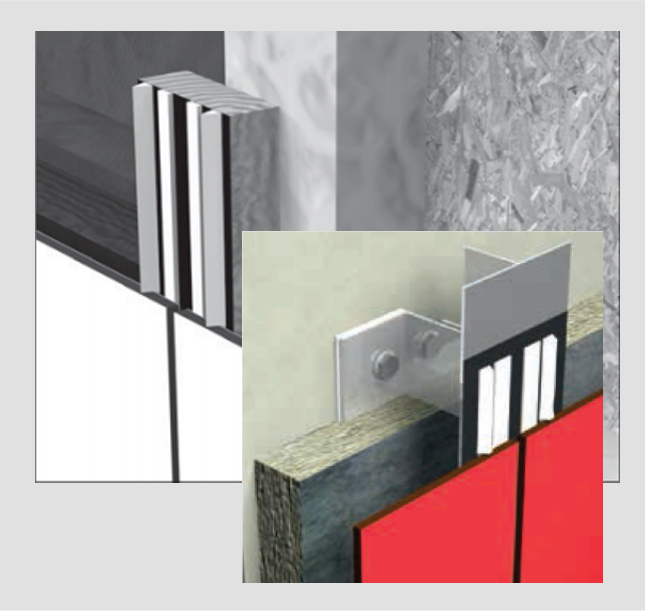
This is a system where the plate is adhered using of adhesive fixing to a substructure made of vertical and horizontal mullions.
It is a lightweight system with concealed fixing. It is quick and economic to assemble. It allows for modulations both horizontally as well as vertically. As it is a glued system with chemical fixings, it is resistant to aging and the elements, absorbs vibrations and offer s multiple possibilities for facade design.
All of the substructure will be made using 6063 T6 aluminium profiles. The fixings or spacers in an ‘L’ shape will be situated against each other in order to bidimensionally absorb the facade’s irregularities. SC1 is fixed to the vertical parameter using special mechanical wedges that are recommended in each case by the fixing suppliers.
Steps to follow for assembly
Clean the substructure
The substructure must be clean, dry, homogeneous and free of oils, grease, dust or badly adhered particles. Paint, whitewash and other coatings must be removed.
ASSEMBLY DIAGRAM SYSTEM RIVETED
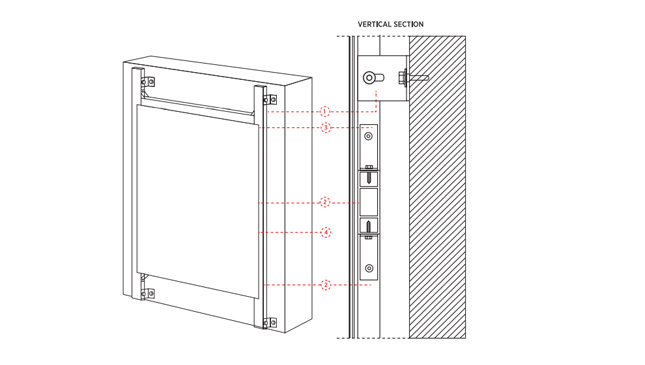
| Serial | Designation |
|---|---|
| 1 | Angular |
| 2 | Glued mullion |
| 3 | Glued mullions joint |
| 4 | Aludecor composite panel |
| 5 | Specific adhesive |

Sign In
Create New Account